Thursday 9 June 2016

Mobile phone charger from dry cell AA/AAA 0V to 2.4V

Charge mobile phone from dry cell AA or AAA 0V to 4.5V from a simple easy to make using less component mobile phone charger.


We all know that for the cell phone to charge, charger output must be above 4V and which can deliver a maximum current of 500mA if used from dry cell or AA type battery.

Here our charger circuit will step up the voltage from 1.5V to 5V DC to reach the cell phone charging requirement. The circuit uses only an AA or AAA 1.5v battery (1V to 2.4V). The charger is composed of simple oscillator, a rectifier, and voltage regulator.


CIRCUIT DIAGRAM:


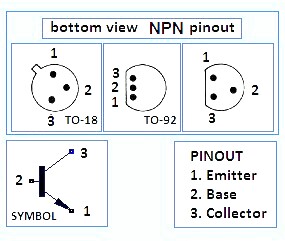
The feedback winding F  here is composed 5 turns of #30 AWG magnetic wire and main winding P is composed of 6 turns of #24 AWG wire.
The 5.1V zener diode and 2200uF capacitor here regulates the output voltage to ensure proper charging of cell phones.


Here the windings are not very critical, you can experiment using different number of turns here. If ever the charger doesn’t have any output, try to reverse the winding connection.

This cell phone charger can charge the cellphone battery only for short period of time because the 1.5 volt battery power capacity wattage is much lower than the phone’s battery.

So this can be used when there is emergency when we travelling to such places where there is scarcity of electricity.


For any further query please ask them in comment section i will be happy to answer them.

Saturday 16 January 2016

Electronic mosquito repelent ultrasonic frequency generator circuit


Dear friends today we are going to learn how to make a circuit which act as mosquito repellent.

This circuit is very much easy to understand and use. A circuit with minimum components repel mosquito. Large number of things like coils, creams, oils is available in the market to repel mosquito. But these replant is also harmful for the humans . Oils and creams can led to skin disease, while coils or mats produces toxic fumes which can lead to breathing problem and lung cancer.

Our circuit do no harm for human being as it produces frequency which human being can not hear. Mosquito repellent generates a frequency ranges from 20-38 KHz. And mosquito runs away from your house as they irritates from these range of frequency.
Humans are only able to hear frequency which has a range from 20Hz to 20 KHz. All the rest frequency above this is considered as a ultrasonic frequency. Many animals and insects are able to hear this range of frequency. Usually in mosquitoes ultra sound is generated by the males and female one receives that one. While after breeding female mosquito usually used to avoid this frequency. And this circuit produces the same frequency as the male one generates, and these creates a stress on the antennae of the mosquito and these keep them away.
Here the basic principal of this circuit is to connect a such type of buzzer which can produce ultrasonic frequency range. With the help of oscillator in the circuit, buzzer is driven. And in the circuit oscillation is generated by 555 timer IC which is linked as a astablemultivibrator.

The circuit is connected in the closed mode and thus power is received by the 555 timer. In the starting stage voltage in the capacitor is zero volts.

So the voltage at the threshold `as well trigger pin is at zero volts. Now the capacitor starts charging via a resistor R1 and R2.There will be one point when the voltage of capacitor will be higher as compared to threshold voltage. At this stage capacitor starts discharging with the help of resistor R2, which is a discharging pin and it keeps of going downward till it reaches to its original state. Thus the signal at the output pin of IC will be an oscillating signal having 38 KHz frequency. With the help of pin 3 of timer IC 555 which is out pin of IC 38 KHz frequency drives to 38 kHz piexo buzzer. This buzzer will produce a ultrasound at a regular interval.
By altering the value of resistor R2 we can alter the output frequency.
By changing the value of resistor and capacitor, it can also use as an insect replier as insects are also able to hear ultrasound.
From the source ultrasound are transportable only at 45 degree. So in the situation when there is any hurdles in the track signals get diverted. Also it works on the place where population of mosquito are not much more.

Component Description:-

1. Power supply (12V)

2. Resistors (2.7kΩ x 2)

3. Capacitors (0.01µF x 2)

4. NE 555 timer

5. IC Diode (1N4007)

6. Piezo Buzzer


Working principle:-

(1) Here the 555 timer is configured in astable multivibrator mode , specifically devised for generating sound at the ultra frequency levels.

(2) The frequency of this circuit is set to 25 kHz, this frequency falls in the ultrasound region and it is not audible to human beings.
The 1N4007 diode is used to get 50% duty cycle for the frequency generator.

(3) The piezo buzzer converts the output of 555 astable to ultrasonic sound that can be heard by the insects.

(4) This ultrasound frequency cause some irritations and uneasiness to the insects such as mosquitoes. However it will not disturb you if you have installed this circuit of insect repellent for your home.

How to design this circuit:-

We need 25 kHz signal, so the time period will be 40µseconds .
Then T =T =20µSeconds .
use R= 2.7kΩ standard.

Friday 15 January 2016

Simple real puspose touch switch using transistor circuit

Dear friends, today we are going to learn how to make a Touch Switch ( On and Off switches separated) to use it as a wall socket switch.

There are lot of touch circkts on internet but those ate only one state switch means when you touch they will switch on and when you dont touch they switch off. Our touch switch has separated touch plate for ON and Off and it keep it state until switched off by touching switch off plate. Advantage of this is that you are sure which circuit state you really want, unlike the other touch switch that uses only one plate for on and off. You can replace the bulb with a relay to power up any device.

Part List :-

R1 - 500  kilo ohms 1/4Watt

R2 - 3.9 Mega ohms 1/4Watt

R3, R4 - 5 kilo ohms 1/4Watt

Q1, Q2, Q3 - 2N2222, 9013, or similar NPN transistor

Q4 - 2N4403 or similar (higher the better) PNP transistor

Touch plate - any touch plate for
Lamp - 3V to 6V bulb or relay
DC - 6V battery

Enjoy making such interesting touch switch circkit. If any query arises please ask them in comment section.

6V Solar battery charger circuit using LM317

Today we are going to learn how to make a simple solar battery charger for 6V battery.

The solar charger we are going to make is based on LM317 regulator IC. When battery has reached is full charge voltage (Battery voltage is higher than VDz + 0.7v), our charger circuit automatically cuts the charging to protect the battery form damage. The LED light will indicate the full charge state in the battery.

Our charger circuit will work only when the voltage level from the solar panel is much higher than the battery voltage, unlike the solar charger with regulator and controller that can charge regardless the solar voltage.

Part List:-

Solar - 12V solar cells array

C1 - 470uF electrolytic capacitor rated 25V

D1, D2 - 1N5400 or any rectifier diode rated 2A minimum

Dz - 1N5235B or any 6.8V zener diode

R1 - 3 kilo ohms 1/4Watt

R2 - 330 ohms 1/4Watt

R3 - 560 ohms 1/4Watt

R4 - 2 kilo ohms 1/4Watt

LED -3mm or 5mm Red or any low power LED

Q1 - 2N2222, CS9013, or similar NPN transistor

Bat - 6V lead acid battery

Make the above simple circuit to charge your 6V battery from clean and environment friendly energy.

If any query arises pleas ask them in the comment section, i will be happy to answer.

Simple 2.7V 200mA USB Battery Charger Circuit

Today we are going to learn how to make a 5V 200mA or more amperage USB Battery Charger circuit for NiCd battery or power source circuit

This is a simple charger circuit for nickel-cadmium battery (NiCd) that can be connected in your USB port of computer or laptop.

The charging scheme employs only a constant current charging.

The two NiCd cells are connected in series and charge at 200mA current. Charging current is controlled by zener diode D1 and resistor R1. We can increase or decrease the current by using the approximate equation:
Current = VD1/R1; where VD1 is the zener voltage.

The use of D2 diode is to limit the voltage across the battery terminals, thus protect the battery from damage. Charging time of the fully discharged battery is given by the formula:
Time = Battery rating / 200mA ; where Battery rating is in mAH.
Example: battery rating 220mAh;
Time = 2200mAH / 200mA = 11 hours; meaning do not let battery charged more than 11 hours.

Part List:-

D1, D2 - BZX84C2V7, 1N5223B, or any 2.7V zener diode 1Watt

R1 - 10 ohms 1/2Watt

R2, R3 - 2 kilo ohms 1/4Watt

Q - 2N2907, 2N4403, or any similar PNP transistor

Make the above circut and enjoy charging. For any further querry please ask them in the comment section, i will be happy to help.

Automatic simple 12V 100mA NiCd Battery Charger circuit

Today we are going to learn how to make a very cheap NiCd battery charger with overvoltage protection or control circuit. This circuit is very much simple and specifically designed for 12V NiCd battery. The charger have current and voltage control at the same time.

Its charging current is around 100mA but we can change it using the formula : (Vd1 - 0.7) / R2 ; where Vd1 is voltage of zener diode D1.

Its Cutoff voltage is limited to Vd2 - 0.7 ; where Vd2 is voltage of zener diode D2

Part List:-

R1 - 2.7 kilo ohms 1/4watt

R2 - 56 ohms 1Watt

D1 - 1N4735A or any 6.2V zener diode

D2 - 1N5244B or any 6.2V zener diode

D3 - 1N4001 or similar diode

Q1 - 9013, 2N2222 or similar NPN transistor

Q2 - 2N3440 or similar NPN transistor

Simply solder the above circuit and enjoy simple 12v 100 mA or change it.

For any further querry please ask them in comment section. I wil be happy to help.

Make a simple electronic audio amplifier using LM317

Today we are going to learn how to make a simple amplifyer which can amplify any audio signal by using LM317 regulator IC. The amplifier can deliver upto 1W power max and needs only few parts which are easily available. This circuit is originally from vegmatic1966 youtube channel.

Part List:
C1, C3 - 10uF electrolytic capacitor rated 16V

C2 - 470uF electrolytic capacitor rated 16V

R1 - 470 ohms 1/2W

R2 - 10 ohms 2W

POT1 - 5 kilo-ohms potentiometer

SPK - 8 ohms rated 1W speaker

LM317 - 317 or any similar regulator IC

What to do:-

After you assembled the circuit shown above, adjust potentiometer POT1 until the voltage across R2 terminals is half the supply voltage (around 4.5V approximately).

Don't forget adding heatsink or any aluminium sheat for cooling the IC LM317 because it will going to heat up a lot. Check the polarities and pins of the parts before testing.

Part pinouts:


Some basics of Electronic power supply circuits before building them.

Some of the Parts of a Power Supply are:

A DC Power Supply Unit or a power supply unit (PSU) is deriving power from the AC mains (ac or mains line110/220 VAC) supply performs a number of tasks:

1:-  It changes (increase or decrease, mostly decreases the level of supply to a value suitable for driving the load circuit.

2:-  It produces a DC supply from a AC supply.

3:-  It prevents any AC from appearing at the supply output terminals.

4:-  It will ensure that the output voltage is at a constant level or not, independent or irrespective of changes in following parameters:-

(a) The AC supply voltage at the supply input.

(b) The Load current drawn from the supply output.

(c) and Temperature.

To do these things the basic power supply unit or a PSU has four main stages, those are:-

Power supplies in recent times have greatly improved in reliability now but, because they have to handle considerably higher voltages and currents, they are often the most susceptible to failure of any part of an electronic circuits.

Modern power supplies have also increased greatly in its complexity, and they can supply very stable output voltages with or without a controlled feedback systems. Many of the times we incorporat a automatic safety circuit to prevent dangerous or disastrous over voltage or over current situations.

That's why the study of modern electronics basics is essential to understand the electronic systems today.

NOTE:-

Warning
If you are considering building or repairing a power supply, especially one that is powered from mains (line) voltages the power supply CIRCUIT on this site will help you understand how many commonly encountered circuits work. However you must realise that the voltages and currents present in many power supplies are very dangerous and fetal, and can be present even when the power supply is switched off! At worst, the high voltages present in power supplies can, and from time to time really  do KILL.
The information provided on this site will not alone, qualify you to work safely on power supplies units or simply PSU. You must also have the skills and equipment to work safely.

Please act responsibly, the author Alok kumar of this information and owners of this site will accept no responsibility or liability for any damage or injury caused to persons or to any third parties, property or equipment arising from the use or misuse of the information provided on this websites which is www.electronicpowersupply.blogspoy.com

Friday 28 November 2014

Make 400V DC from 220V AC Circuit

How to Make a 400V DC from 220V AC Simple Circuit at home.

By:

Today we are going to need a simple 400V Electronic transformerless power supply or variable power supply from 0 to 400V DC. So simply we will learn how to get 400V DC from 220V AC Mains.

The Below Circuit is a simple rectifier circuit.

This circuit simply rectifies the 220V AC from Mains to DC pulsating Voltage and then this pulsating DC viltage is then Filtered via a 470uF/450V electrolytic capacitor to reduce the Ripple present in the output of the circuit.

Friday 21 November 2014

Make Automatic 12V Portable Battery Charger Circuitat

How to make a Automatic 12 V Portable Battery Charger Circuit at Home


By:

Today we are going to learn how to make a Portable Automatic 12 volt battery charger circuit which starts charging Battery Automatically when the voltage of that Battery is below the specified voltage value. This charger will Automatically stops the charging process when Battery attains the full charge value. This process protect our battery from deep-charge and if voltage is below 12 V it start charging.

Here the main component is IC LM317. Here the power source is transformer but it can be any electronic supply ( for example SMPS power supply).

Components Required:


  • 15-0-15V, 1A center tapped transformer 
  • LM317T voltage regulator
  • 12V DC battery
  • BD139 NPN transistor
  • LED’s – red, green
  • 8.2V zener diode
  • 1n4007 diodes – 3

Wednesday 19 November 2014

How to install solar panel at roof top and stay off the grid life chapter-2

How to select the type, Quality and quantity of Solar Panel for living a Grid free life. What are the total daily Wattage requirement for average household.


By:

How to select the best solar panel for home to enjoy grid free life, is the most popular question asked by the guys all around the world. To understand how to choose the solar panel array one should be familiar with certain electrical terminology which are ( if you simply know this basic thongs skip this paragraph):

  • Voltage
  • Amperage
  • wattage 

    Voltage: The potential difference between two points. Is measured in Volts (V) and has the symbol                   ‘V’.

    Current: The flow of electrons in a circuit. Is measured in Amps (A)and has the symbol ‘I’.

    Resistance: A material’s opposition to an electrical current. Is measured in Ohms (Ω) and has the                          symbol ‘R’.

    Power: The rate of doing work. Is measured in Watts and has thesymbol ‘P’.

    Energy: The capacity for work, the product of power and time. Has the symbol ‘E’. The basic unit of              energy is the Joule, but electrical energy is normally expressed in Watt hours (Wh) or kilo                    Watt hours (kWh). One kWh is 1000 Wh.

    The relationship between these units is:

    How to install solar panel at roof top and stay off the grid life chapter-1

    How to install solar panel at home's roof top and save electricity and stay of the grid life forever-chapter-1


    What are solar panels?,  what are the types of solar panel?,  How efficient are they?

    By:

    From now we are going to start a solar panel project which will guide the solar energy enthusiasts to install solar pannel at home and stay grid free life.

    Before starting a step by step tutorial on How to install solar panel at home's roof top to stay off the grid life, we should know certain basic things first. These are:

    • we should know that what actually a solar panel is?
    • what are the types of solar pannels?
    • How efficient are they?

    What are solar panels?

    Solar panels are devices that convert the light into electricity (only DC). They are called "solar" panels because most of the time, the most powerful source of light available is the Sun, called Sol by astronomers. Some scientists call them photovoltaics which means, basically, "light-electricity."

    Solar panel wings installed on satellite in deep space


    A solar panel is a collection of small solar cells. Lots of small solar cells spread over a large area can work together to provide enough power to be useful like an power house. Here the more light hits a cell, the more electricity it produces, so spacecraft are usually designed with solar panels that can always be pointed at the Sun even as the rest of the body of the spacecraft moves around, much as a tank turret can be aimed independently of where the tank is going.

    special purpose DS1's solar cells are even more efficient than regular solar panels made for satellites because they use solar concentrators.

    Tuesday 18 November 2014

    Make a PWM Controlled Cell Phon Battery Charger using IC555

    How to Make a Simple PWM Controlled DC to DC Cell Phone Charger Circuit vy using IC 555 at Home


    Today we are going to learn how to make a very simple PWM DC to DC Cell phon charger circuit. The circuit is a simple cell phone charger that may be operated with any DC source, from a car or a motorcycle battery or from any ordinary 12 V AC DC adapter. Nowadays we find most of the vehicles have their in built cell phone battery charger units which surely becomes very handy for travelers who mostly remain outdoors travelling in their vehicle.
    This PWM cell phone battery charger circuit is as good as the conventional chargers which come fitted inside the cars and bikes. Moreover the circuit can be simply integrated to ones own vehicle if the feature is not originally available in the vehicle. Alternatively one may think of manufacturing the present unit and selling them in the market as an automobile cell phone charger and earn some hard bucks.

    Monday 17 November 2014

    Make a Simple Solar MPPT Charger Circuit at Home

    How to Make a Solar MPPT Charger Circuit - Maximum Power Point Tracker Circuit


    By:
    Todat we are going to to learn how to make a simple but effective and cheap solar MPPT Charger circuit at home. Here MPPT stands for maximum power point tracker, which is an electronic charging system designed for optimizing the varying power output from a solar panel module such that the connected battery exploits the maximum available power from the solar panel.
    The output from a solar panel is directly proportional to the degree of the incident sunlight, and also the ambient temperature. When the sun  rays are perpendicular to the solar panel, it generates the maximum amount of Power, and deteriorates as the angle shifts away from 90 degrees  The atmospheric temperature around the panel also affects the efficiency of the panel, whose power falls with increase in the atmospheric temperature.
    Therefore we may conclude that when the sun rays are near to 90 degrees over the panel and when the temperature is around 30 degrees, the efficiency of the panel is maximum, Here the rate decreases as the above two parameters drift away from their rated values.

    Sunday 16 November 2014

    Make parallel Battery Charger Circuit by SPDT switches

    How to Make Parallel Battery charger Circuit Using One Charger by SPDT Switches


    Today we are going to learn how to charge multiple batteries individually which is connected in parallel using a single battery charger through a manual SPDT changeover switch bank. This simple circuit might be a very useful circuit for those who have lots of battery and they don't wanted to do that manually process  of charging batteries.

    In below diagram, here the configuration shows four batteries with their negatives connected together to form a common negative rail and the positives are all terminated individually to the poles of four discretely attached SPDT switches.

    The one of the two changeover contacts of the SPDT switches are appropriately connected with the output load while the others with the battery charger positive.

    All the above terminations are made via separate rectifier diodes, each for output and input positives